Features
Industries
Who we serve
Resources
Sign in
Get Started - $500/month
No commitment. No implementation fee. Unlimited users. Cancel anytime
.jpg)
And these statistics come from normal operating conditions. Storm restoration adds fatigue, damaged infrastructure, changing work zones, and compressed timelines to the equation. When crews are racing to restore power, a missed isolation point or incomplete lockout/tagout procedure can turn a routine task into a life-threatening incident.
Lockout tagout (LOTO) is the procedure for isolating every hazardous energy source connected to a piece of equipment before anyone services or maintains it, and verifying that those sources cannot be accidentally re-energized while workers are present.
The name describes the two primary control methods.
A lockout means physically applying a padlock to an energy isolating device, a circuit breaker, a disconnect switch, and a valve so that it cannot be operated. The key stays with the worker who applied the lock. Nobody else can remove it.
A tagout is used where a device cannot be physically locked: a warning tag is attached indicating that the equipment must not be operated and must not be re-energized until the tag is removed by the person who placed it.
The governing OSHA standard for general industry is 29 CFR 1910.147.
For utility crews doing electric power generation, transmission, and distribution work, which is most storm restoration linework, the governing standard is 29 CFR 1910.269. The requirements under both are nearly identical in substance, but the distinction matters for compliance purposes, and it matters for how your written procedures need to be drafted.
During normal operations, the energy sources on equipment are known and documented. During storm restoration, crews are working on systems that may have been partially energized by other restoration crews, on circuits with unclear switching history, in conditions where the normal single-source isolation assumption may not hold.
This is why Logout tagout in storm restoration is not a routine procedure. It is a life-critical one that requires more discipline, not less, when pressure and fatigue are highest.
This is where utility and contractor crews most commonly get confused and where compliance failures start.
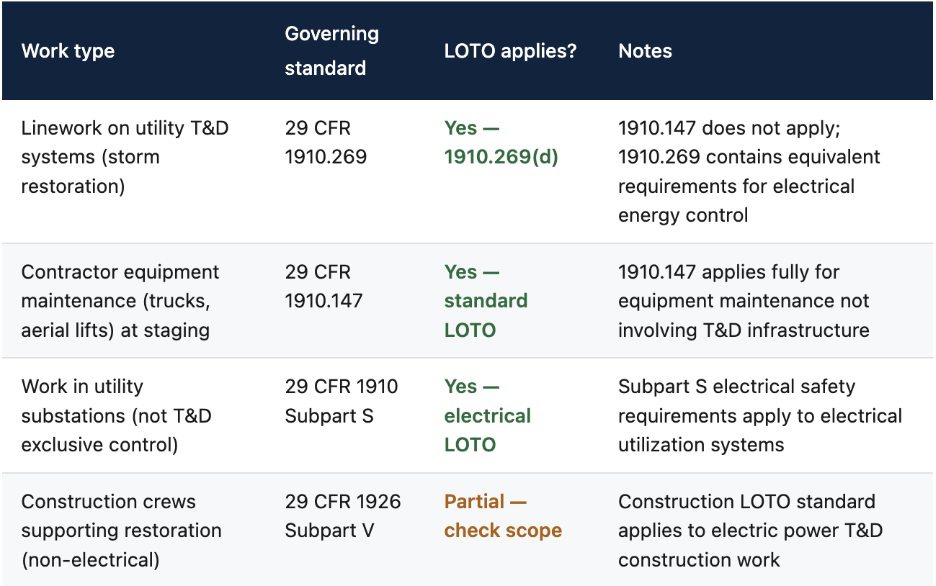
The practical implication: most storm restoration contractors will have crews under multiple standards simultaneously.
Lineworkers on distribution circuits are under 1910.269. The mechanic servicing bucket trucks back at the staging yard is under 1910.147. Your written energy control program needs to address both, and your supervisors need to know which standard governs which crew on which task.
These steps come directly from OSHA 1910.147(d) and are mirrored in 1910.269(d). Every step is required. The verification step is the most commonly skipped and the most commonly cited.
Identify all energy sources connected to the equipment: electrical, hydraulic, pneumatic, mechanical, thermal, chemical. On storm restoration sites, this means accounting for potential backfeed from partially restored adjacent circuits and not just the obvious primary source. Review the equipment-specific written Logout/tagout procedure before touching anything.
Failure mode in storm restoration is that crews assume they know the energy sources from previous similar jobs. Partially restored circuits mean that assumption is dangerous.
Every employee whose work area will be affected by the shutdown must be notified before Lockout/tagout begins. In a large restoration deployment, that means coordinating with other crews working the same circuit segment, not just the immediate crew.
Failure mode: one crew applies lockout without notifying a second crew working 200 meters down the same line.
Use the normal stopping procedure for the equipment. Do not bypass interlocks or use emergency stops as a substitute for the proper shutdown sequence.
Operate every energy isolating device to the safe (de-energized) position. For electrical lockout tagout specifically, this means opening disconnects and circuit breakers, all of them, for every energy source identified in step one, not just the primary feed.
Failure mode in electrical Lockout/tagout: isolating the primary feed but missing a secondary or backfeed source on a partially restored circuit.
Each authorized employee applies their own personal padlock to each energy isolating device. No sharing locks. If multiple workers need to work on the same equipment, a group lockout hasp allows each worker to apply their own lock to a single isolation point. Tagout devices are used only when a device cannot be physically locked and the standard is clear that tagout provides less protection than lockout.
De-energization is not complete after applying locks. Stored energy, charged capacitors, pressurized lines, suspended components under gravity load, residual electrical charge — must be released, bled, discharged, or blocked before work begins. On energized system work, this step includes grounding procedures under 1910.269.
After applying all lockout devices, the authorized employee must verify that the equipment is actually in a zero energy state. For electrical systems, this means testing with an approved voltage detector to confirm the circuit is de-energized. For mechanical equipment, it means attempting to start the machine while standing clear. If the equipment can still be started or energized, lockout has not been completed.
This is the single most-cited Lockout/tagout violation in OSHA inspections. The verification step is not optional and is not implied by completing steps 1 through 6.
Only after all seven preceding steps are complete and verified does work begin. If the scope of work changes and new energy sources may be involved, the lockout tagout procedure starts over from step one for those sources.
Before any lockout device is removed: inspect the work area to confirm all tools and components are clear, verify all employees are safely positioned away from the equipment, and notify affected employees that lockout is ending. Only the employee who applied a lock may remove it. If that employee is not present in shift change, demobilization, injury, there is a specific documented process required before any supervisor can remove someone else's lock.
A well-stocked electrical lockout tagout kit is a compliance requirement. Under 1910.147 and 1910.269, authorized employees must have access to appropriate lockout devices. Arriving at a work site without proper lockout tagout hardware is arriving without the ability to work safely or legally.
Here’s what your lockout tagout kit must contain:
A safety tailboard also called a tailgate meeting, or pre-job briefing is the daily or pre-task safety meeting held before crews begin work.
For lockout tagout, it is the last planned opportunity to make sure every person on the crew understands the specific energy sources at today's site, who is authorized to apply and remove locks, and what to do if something does not match the procedure.
Here is the reality of storm restoration tailboard briefings: they are 90 seconds long when they should be five minutes, held while crews are climbing out of trucks and checking their phones, and treated as a compliance ritual rather than an operational safety step.
The pressure to restore power is real and constant. The tailboard is where that pressure most directly conflicts with the discipline Lockout tagout requires.
A complete lockout tagout tailboard for storm restoration should cover these six points, and it should take at least five minutes every single time:
The 7 essential storm response safety checklists we've built for utility crews treat the tailboard as a documented operational record rather than a verbal ritual. That shift, from memory to record, is what makes a safety briefing defensible when it matters.
See also our guide on the safety leading indicators that predict incidents before they happen, where tailboard completion rate is one of the eight highest-predictive metrics.
The practical barrier to consistent lockout tagout tailboard documentation during storm restoration is not willingness. Crews know lockout tagout matters. The barrier is friction: paper forms that blow away, clipboards that get left in trucks, sign-off sheets that end up in someone's bag and never make it back to the office.
Digital safety tailboards solve this by moving the briefing record to the same mobile device crews already carry for time tracking and work orders. A KYRO AI safety form takes 30 seconds to complete at the end of a tailboard, crew members sign off on a mobile screen, the record is timestamped automatically, and it syncs to the central safety log without a manual step.
This also feeds directly into the leading indicator tracking that predicts incident risk before it becomes an incident report. A crew whose tailboard completion rate drops below 85% is statistically at higher risk of a lockout tagout -related incident. You can see that trend in real time when briefings are captured digitally. You cannot see it at all when they are done verbally and undocumented.
With KYRO AI, crews can quickly access and complete OSHA-aligned safety forms from the field, including pre-job briefings, JHAs, tailgate meetings or tailboards, and incident reports. Every submission is timestamped, GPS-tagged, and instantly visible to supervisors, making it easier to track compliance and monitor safety activity across all deployed crews.
And these statistics come from normal operating conditions. Storm restoration adds fatigue, damaged infrastructure, changing work zones, and compressed timelines to the equation. When crews are racing to restore power, a missed isolation point or incomplete lockout/tagout procedure can turn a routine task into a life-threatening incident.
Lockout tagout (LOTO) is the procedure for isolating every hazardous energy source connected to a piece of equipment before anyone services or maintains it, and verifying that those sources cannot be accidentally re-energized while workers are present.
The name describes the two primary control methods.
A lockout means physically applying a padlock to an energy isolating device, a circuit breaker, a disconnect switch, and a valve so that it cannot be operated. The key stays with the worker who applied the lock. Nobody else can remove it.
A tagout is used where a device cannot be physically locked: a warning tag is attached indicating that the equipment must not be operated and must not be re-energized until the tag is removed by the person who placed it.
The governing OSHA standard for general industry is 29 CFR 1910.147.
For utility crews doing electric power generation, transmission, and distribution work, which is most storm restoration linework, the governing standard is 29 CFR 1910.269. The requirements under both are nearly identical in substance, but the distinction matters for compliance purposes, and it matters for how your written procedures need to be drafted.
During normal operations, the energy sources on equipment are known and documented. During storm restoration, crews are working on systems that may have been partially energized by other restoration crews, on circuits with unclear switching history, in conditions where the normal single-source isolation assumption may not hold.
This is why Logout tagout in storm restoration is not a routine procedure. It is a life-critical one that requires more discipline, not less, when pressure and fatigue are highest.
This is where utility and contractor crews most commonly get confused and where compliance failures start.
The practical implication: most storm restoration contractors will have crews under multiple standards simultaneously.
Lineworkers on distribution circuits are under 1910.269. The mechanic servicing bucket trucks back at the staging yard is under 1910.147. Your written energy control program needs to address both, and your supervisors need to know which standard governs which crew on which task.
These steps come directly from OSHA 1910.147(d) and are mirrored in 1910.269(d). Every step is required. The verification step is the most commonly skipped and the most commonly cited.
Identify all energy sources connected to the equipment: electrical, hydraulic, pneumatic, mechanical, thermal, chemical. On storm restoration sites, this means accounting for potential backfeed from partially restored adjacent circuits and not just the obvious primary source. Review the equipment-specific written Logout/tagout procedure before touching anything.
Failure mode in storm restoration is that crews assume they know the energy sources from previous similar jobs. Partially restored circuits mean that assumption is dangerous.
Every employee whose work area will be affected by the shutdown must be notified before Lockout/tagout begins. In a large restoration deployment, that means coordinating with other crews working the same circuit segment, not just the immediate crew.
Failure mode: one crew applies lockout without notifying a second crew working 200 meters down the same line.
Use the normal stopping procedure for the equipment. Do not bypass interlocks or use emergency stops as a substitute for the proper shutdown sequence.
Operate every energy isolating device to the safe (de-energized) position. For electrical lockout tagout specifically, this means opening disconnects and circuit breakers, all of them, for every energy source identified in step one, not just the primary feed.
Failure mode in electrical Lockout/tagout: isolating the primary feed but missing a secondary or backfeed source on a partially restored circuit.
Each authorized employee applies their own personal padlock to each energy isolating device. No sharing locks. If multiple workers need to work on the same equipment, a group lockout hasp allows each worker to apply their own lock to a single isolation point. Tagout devices are used only when a device cannot be physically locked and the standard is clear that tagout provides less protection than lockout.
De-energization is not complete after applying locks. Stored energy, charged capacitors, pressurized lines, suspended components under gravity load, residual electrical charge — must be released, bled, discharged, or blocked before work begins. On energized system work, this step includes grounding procedures under 1910.269.
After applying all lockout devices, the authorized employee must verify that the equipment is actually in a zero energy state. For electrical systems, this means testing with an approved voltage detector to confirm the circuit is de-energized. For mechanical equipment, it means attempting to start the machine while standing clear. If the equipment can still be started or energized, lockout has not been completed.
This is the single most-cited Lockout/tagout violation in OSHA inspections. The verification step is not optional and is not implied by completing steps 1 through 6.
Only after all seven preceding steps are complete and verified does work begin. If the scope of work changes and new energy sources may be involved, the lockout tagout procedure starts over from step one for those sources.
Before any lockout device is removed: inspect the work area to confirm all tools and components are clear, verify all employees are safely positioned away from the equipment, and notify affected employees that lockout is ending. Only the employee who applied a lock may remove it. If that employee is not present in shift change, demobilization, injury, there is a specific documented process required before any supervisor can remove someone else's lock.
A well-stocked electrical lockout tagout kit is a compliance requirement. Under 1910.147 and 1910.269, authorized employees must have access to appropriate lockout devices. Arriving at a work site without proper lockout tagout hardware is arriving without the ability to work safely or legally.
Here’s what your lockout tagout kit must contain:
A safety tailboard also called a tailgate meeting, or pre-job briefing is the daily or pre-task safety meeting held before crews begin work.
For lockout tagout, it is the last planned opportunity to make sure every person on the crew understands the specific energy sources at today's site, who is authorized to apply and remove locks, and what to do if something does not match the procedure.
Here is the reality of storm restoration tailboard briefings: they are 90 seconds long when they should be five minutes, held while crews are climbing out of trucks and checking their phones, and treated as a compliance ritual rather than an operational safety step.
The pressure to restore power is real and constant. The tailboard is where that pressure most directly conflicts with the discipline Lockout tagout requires.
A complete lockout tagout tailboard for storm restoration should cover these six points, and it should take at least five minutes every single time:
The 7 essential storm response safety checklists we've built for utility crews treat the tailboard as a documented operational record rather than a verbal ritual. That shift, from memory to record, is what makes a safety briefing defensible when it matters.
See also our guide on the safety leading indicators that predict incidents before they happen, where tailboard completion rate is one of the eight highest-predictive metrics.
The practical barrier to consistent lockout tagout tailboard documentation during storm restoration is not willingness. Crews know lockout tagout matters. The barrier is friction: paper forms that blow away, clipboards that get left in trucks, sign-off sheets that end up in someone's bag and never make it back to the office.
Digital safety tailboards solve this by moving the briefing record to the same mobile device crews already carry for time tracking and work orders. A KYRO AI safety form takes 30 seconds to complete at the end of a tailboard, crew members sign off on a mobile screen, the record is timestamped automatically, and it syncs to the central safety log without a manual step.
This also feeds directly into the leading indicator tracking that predicts incident risk before it becomes an incident report. A crew whose tailboard completion rate drops below 85% is statistically at higher risk of a lockout tagout -related incident. You can see that trend in real time when briefings are captured digitally. You cannot see it at all when they are done verbally and undocumented.
With KYRO AI, crews can quickly access and complete OSHA-aligned safety forms from the field, including pre-job briefings, JHAs, tailgate meetings or tailboards, and incident reports. Every submission is timestamped, GPS-tagged, and instantly visible to supervisors, making it easier to track compliance and monitor safety activity across all deployed crews.

Rabiya Farheen is a content strategist and a writer who loves turning complex ideas into clear, meaningful stories, especially in the world of utility, tech, AI, and B2B SaaS. She works closely with growing teams to create content that doesn’t just check SEO boxes, but actually helps people understand what a product does and why it matters. With a knack for research and a curiosity that never quits, Rabiya dives deep into industry trends, customer pain points, and data to craft content that feels super helpful and informative. When she’s not writing, she’s probably reading, painting, and exploring her creative side— or you'll find her hustling around for social causes, especially those that empower girls and women.
.jpg)
.jpg)